Monday, December 19, 2016

Artsy Gift Class Creations


Abstract Art Notecards


Here is one student's work, divided and mounted on 8 colored notecards
ready for packaging with envelopes

Shrink Plastic Pin


Shrink Plastic Necklace for Pair of BFF's


Textured Shoe Pendant
using Air Dry Clay

 Salt Dough Ornament
with puff paint and sequins

Salt Dough Pin

 Painted Canvas Shopping Bag


Mexican Folk Art Mirrors


December art classes have been focused on creating artsy gifts for the holidays. My young students have had a lot of fun creating items for friends, family and teachers.

1. Abstract Art Notecards
These were created playing a game of art element Simon Says. Children started with a large sheet of watercolor. I would prompt them with directions like, "Make a diagonal broken line in a cool color." They used oil pastels and colored Sharpies to create a number of different lines in different directions. They added watercolor and salt to finish this first step. The following week, I handed back their papers and we continued the game using acrylic paints with prompts like, "make an organic shape in a secondary color. This was such a fun way for my young students (mostly 1st graders) to learn about primary and secondary colors, organic versus geometric shapes and even complimentary colors. I cut their dried work into eight equal pieces and glued them to colored notecards. These were packaged up with envelopes for a nice one of a kind gift to give to grandparents, teachers or friends.

2. Shrink Plastic Pins and Necklaces
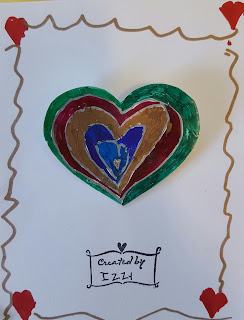
Shrinky Dinks take me back to my childhood. I found this great idea from Alisa Burke here. Children used colored Sharpies to decorate hearts. These were shrunk in the oven to half their size and finally, a pin was glued to the back. Were presented them on pieces of notecards that they could decorate and finished with a "created by" stamp.

3. Textured Shoe Pendant Necklaces
This project is always a winner. My original post can be found here. With just a ball of clay, children stepped lightly to reveal a unique texture. Skewers were used to create a hole to string cord. The following week, these were painted with acrylics, sealed with a coat of Mod Podge and strung with glass beads for a special gift for Mom.

4. Salt Dough Ornaments, Pins, Magnets and Pendants
Kids are always amazed when they learn that with just flour, salt, and water, they can create a dough to make a number of things. I pulled out my big bin of Christmas cookie cutters. Children created a variety of items: angels, doves, Christmas trees, gingerbread men, snowmen ect.. They had the option of creating a number of different gifts. These were baked in the oven for about 2 hours and the following week, children painted and added extra embellishments to their pieces. 

5. Painted Canvas Grocery Bags
This was another project inspired by Alisa Burke and her Wonderful "Messy Pouches" here. Since California has banned the use of plastic bags, I thought it would be a great opportunity for the kids to create painted canvas bags for their parents. Acrylic paint was used to lay down blocks of color. Simple designs were painted on top and puff paint could be used to add finishing touches.

6. Mexican Folk Art Mirrors
Children created these unique gifts by tooling thick sheets of aluminum and adding color with Sharpies. Cardboard mats were painted and embellished with sequins, puff paint and glitter glue. Last, a round mirror was glued in the middle and a wood frame added to showcase their work.

One more day to finish projects and wrap up for friends, teachers and family. This class was a lot of fun and I'm already gathering ideas for next year's session!

Monday, December 5, 2016

"Tree of Friendship" Art Birthday Party

 9 Lovely Trees of Friendship

Ready and Waiting 

 Positioning collaged birds

Sketching out their Klimt style trees with pastel pencils

Creative aftermath

Each time I am hired to lead an art project at a child's birthday party I am sincerely honored. I can still hear my daughter's deadpan comment several years ago, "Some kids get bounce houses, and they chose you?" Ouch! I take on this responsibility with a great deal of consideration. I try to factor in a number of variables: the child's age, interests, number of guests, location ect...

Ella, a third grader, has been coming to my classes since kindergarten. She is a Wonderful artist and approaches each project with a sense of enthusiasm and focus. So I started as I often do, by creating a pinterest board dedicated to different ideas just for the occasion. I narrowed down the field to about 12 ideas. Then we met and I pitched my project proposals. She loved a Klimt inspired tree found here at smART Class. Thanks Natalie! Expanding on the theme, her mom had the idea of creating trees of "friendship" where the girls could write their names on and around each other's trees. Perfect!

I always do a "test drive" for the project, to see how it might work. This was my effort.


 Yes, I got a little carried away with details. But I knew that's what sold Ella on the project.

The Trees of Frienship turned out to be a success! The girls were really into it and could giggle and chit chat in between each painted swirly branch. And of course they had a ball with all the embellishments: glitter glue, puff paint and sequins. Silver Sharpies were perfect for signing each other's pieces. Little sisters and Miss Mary were even invited to join. We had a hard time pulling the girls away from their artwork. But pizza and ice cream sandwiches awaited. What a fun afternoon!

Thursday, December 1, 2016

Recycled Cardboard Butterflies Inspired by David Gerstein

 Skyler, 3rd grade

 Summer, 4th grade


Fiona, 3rd grade 


 Clare, Kindergarten


 Miss Mary, 49  :)

Pinterest is a constant cource of inspiration, from my next "must read", to the perfect crockpot soup,  and on and on. But what I have really enjoyed is stumbling across new (to me) artists that inspire me. Insert David Gerstein. This Israeli born painter and sculptor creates colorful, dynamic pieces full of movement, life and often humor. His outdoor sculptures can be found all over the world. Yup, I'm completely smitten! Here is a link to his metal butterfly sculptures that inspired this project:
http://www.gersteinart.com/animal-kingdom/butterflies.

For this project we utilized recycled cardboard from large boxes and extra large pizza boxes. I had the children draw half of the butterfly shape and used it as a template to cut a second symmetrical wing. They also drew a simple body separately. This project was all about layers. They painted large, simple shapes on their cut bases with a limited color palette. They could add an extra layer of painted shapes in a complimentary or analagous color. On a sheet of watercolor paper, the children created wet on wet dots that were cut out and glued to each wing. I also offered recycled painted paper for them to cut into ovals or circles. These were glued down in a symmetrical manner (or not if they chose to go another route). We added finishing touches with black glue, puff paint and even sequins for some. This was my first time using puff paint and I can see what all the fuss is about. So much fun....like icing a cake!
These pieces measure about 2' X 2 1/2'. I glued a piece of twine to the back so they could be hung.

Here are steps to create one using recycled cereal boxes. This would be a fun project for Earth Day! Ask children to bring in a cereal boxes. You can utilize scrap painted paper or even magazine pages for collaged spots. Instead of puff paint, create colored glue using tempera or acrylic paint shaken with used glue bottles.You can even challenge yourself to use the nearly gone bottles of acrylic and tempera paint (as I did) to paint these. Children can make small circle print details using dried up markers or old pencils dipped in paint. There are lots of fun possibilities here to use what's on hand.


Layer one - acrylic painted shapes in a limited color palette

Painted papers from the recycling bin for collaged spots

Miss Mary's finished cereal box butterfly 

Sunday, November 20, 2016

Mixed Media Lighthouse Art Lesson


Earlier in the year, my young elementary students created some wonderful mixed media lighthouse collages. It's a fun lesson that helps teach children the concepts of foreground, middle ground and background. You can see my original post here:


And the article describing the lesson in more detail, in next month's issue of Arts and Activities magazine here:

Saturday, November 12, 2016

Paper Bag Owls and the Sharpie Art Workshop for Kids Giveaway!

Today is my day to post for the Sharpie Blog Roll by Art Projects for Kids.org leading up to the release of Kathy Barbro's Fantastic new book,


I'm excited to be a project contributor! Kathy was the first art teacher blogger I discovered over seven years ago when I started teaching art classes. She has an amazing knack for breaking down any subject matter in easy to follow steps for kids to draw. She is always coming up with new and creative ideas! So I was thrilled and honored when she asked me to submit a project for her upcoming Sharpie Art book. My students know Sharpie isn't just a proper noun in my classes, it's a verb. They'll often hear me say, "Go ahead and Sharpie your pencil lines."

The book is full of Fun, Creative, and Easy to follow art and craft projects. It releases this Tuesday, November 15th. Kathy is hosting a giveaway for a signed book for three lucky readers. Just follow this link and leave a comment before midnight on November 15th for a chance to win.


In the meantime, here are some other fun ideas for kids to create using Sharpie Markers and brown paper bags


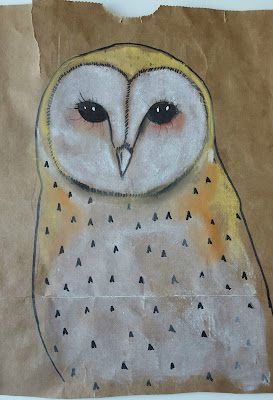
Lunch Bag Owl 

Supplies:

Black Sharpie Marker - Fine Tip, Chisel or King Size
Chalk Pastels
2 brown paper lunch bags
Scissors and glue
newspaper or tissue paper


After you have drawn all your Sharpie lines, add color to your owl using
the side of your chalk pastels with light pressure
Stuff bag with crumbled newspaper
Cut out wings and ear tufts from a separate bag and glue to your owl


Have the kids make these for a fun autumn display on the mantle
or gathered around pumpkins! 


Here's a link to buy the book:

Graphic Owl Luminaria


Supplies:

Brown school lunch bag
Black Sharpie Marker
 Sharpie Markers in Assorted Colors
Battery Tea Light Candle


Kids can get creative with lines and shapes in
creating their graphic owl - here are just a few ideas
After black lines are drawn, color away!

Put these on the mantle or by your front door to welcome
family and friends at your next gathering!

Grocery Bag Owls

Barn Owl
Fun facts: Barn Owls have a distinctive heart shaped face,
 their flight is silent and they don't hoot, they shriek

Supplies:
Brown Grocery Bag, cut into a rectangle
Fine and Ultra Fine Tip Black Sharpie Markers
Chalk Pastels


For a simple, finished composition - on a piece of black construction paper,
create a full moon with chalk pastel and add some stars with a white Sharpie marker.
Just cut out and glue your owl to the backgroud.
(those veins though....lol!)


Great Horned Owl
The Great Horned Owl is named for the tufts of feathers (not ears) that sit on top of its head. The ears are actually openings in the sides of its skull, hidden by feathers, down on the sides of its head.


Create sketchy loose lines with Sharpies
Add a little more color with chalk pastels


Supplies:

Brown Grocery Bag, cut into a rectangle
Sharpie Markers in Black, Brown and White
Chalk Pastels
Create a backgroud of your choice

Check out tomorrow's project of Fibers and Sharpies (using rubbing alcohol for a bleed) from Nic Hahn of Mini Matisse.

Thursday, November 10, 2016

Autumn Art Fun

Here are some of the projects my students have been working on during my favorite season.


 First Grade Mixed Media Squirrel Collages


Tree and Squirrel Silhouettes with Tissue Paper Skies


Mixed Media Raccoon Portraits


Pumpkin Still Lifes on Natural Roofing Felt

Update: Be sure to use Natural roofing felt, Not synthetic, which can contain fiber glass.